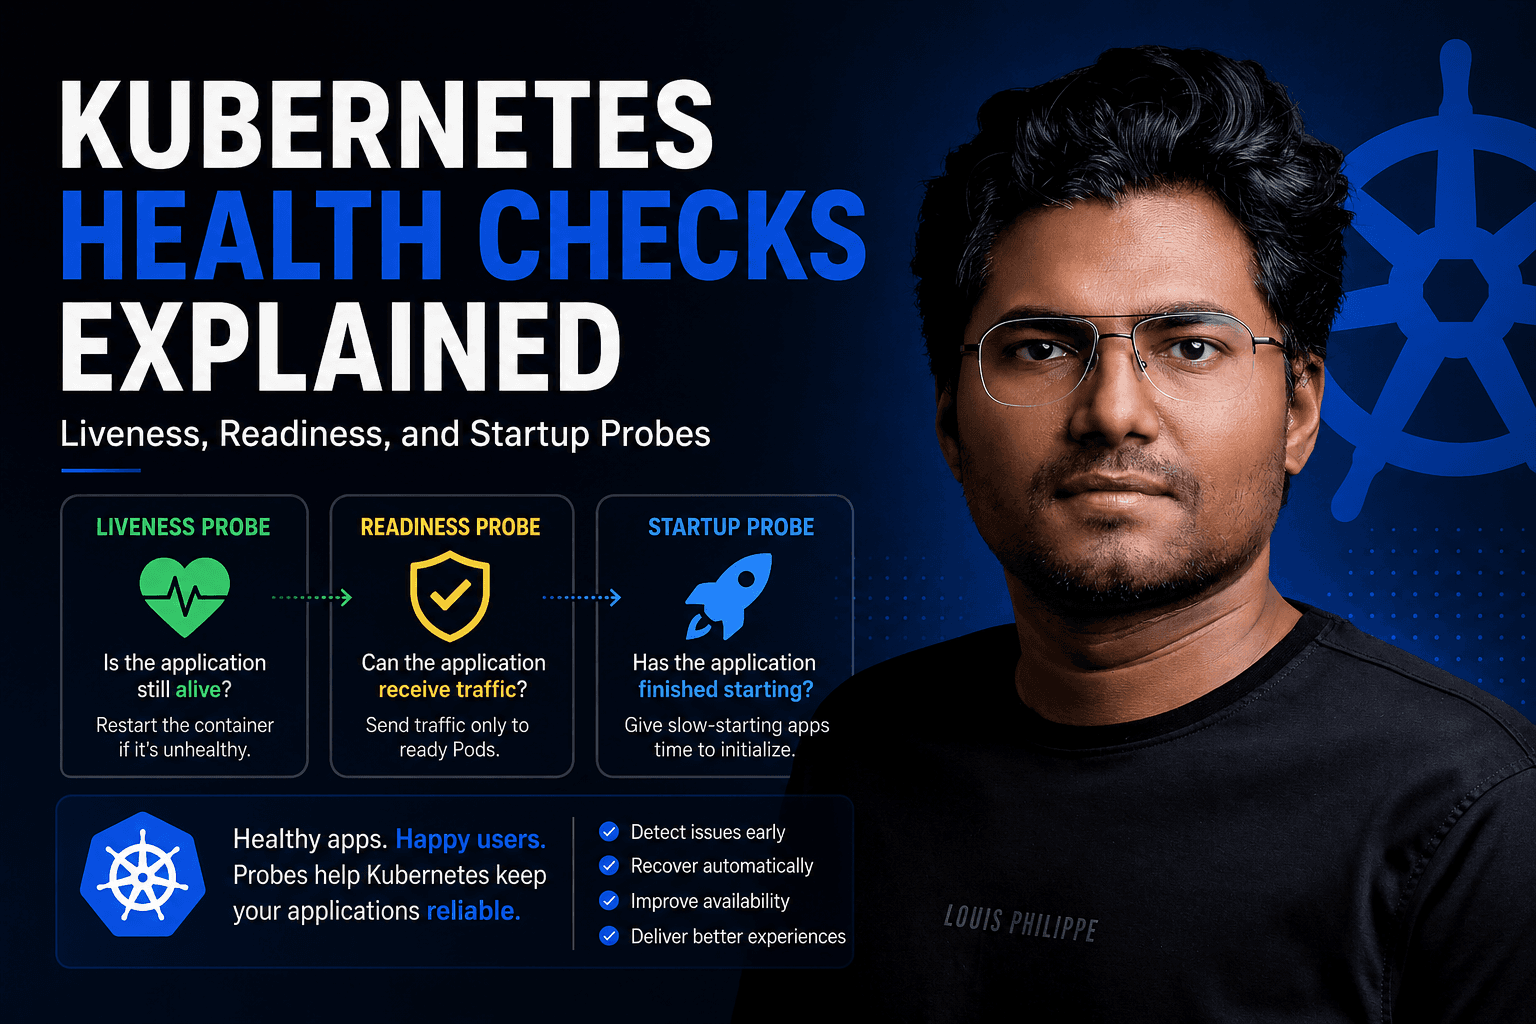
Kubernetes Health Checks Explained: Liveness, Readiness, and Startup Probes
When I first started learning Kubernetes, I thought that if a Pod showed a Running status, everything was working correctly.
The application was running.
The container hadn’t crashed.
The deployment was healthy.
Or so I thought.
As I gained more experience with Kubernetes and prepared for CNCF certifications like CKA and CKAD, I learned that a running container doesn’t necessarily mean a healthy application.
An application can be:
Running but unable to serve requests
Connected to the wrong backend
Stuck in a deadlock
Waiting for a database connection
Starting up slowly
This is exactly why Kubernetes provides Health Checks, also known as Probes.
Understanding these probes is one of the most important skills for anyone deploying applications to Kubernetes.
The Problem Kubernetes Is Trying To Solve
Imagine an application running inside a Pod.
The process is alive, but:
The application cannot connect to the database
A critical dependency is unavailable
The application is still initializing
The server is stuck and no longer responding
From Kubernetes’ perspective, the container is still running.
Without health checks, Kubernetes has no way to determine whether the application is actually usable.
This is where probes come in.
Kubernetes asks three different questions:
Is the application alive?
Is the application ready to receive traffic?
Has the application finished starting?
Each question is answered by a different probe.
Understanding Kubernetes Probes
Kubernetes provides three types of health checks:
Liveness Probe
Readiness Probe
Startup Probe
Each serves a different purpose.
Let’s look at them one by one.
1. Liveness Probe
The Liveness Probe answers a simple question:
Is the application still alive?
Sometimes applications become unresponsive without crashing.
Examples include:
Deadlocked threads
Infinite loops
Memory-related issues
Hung processes
The container is still running, but the application has stopped functioning properly.
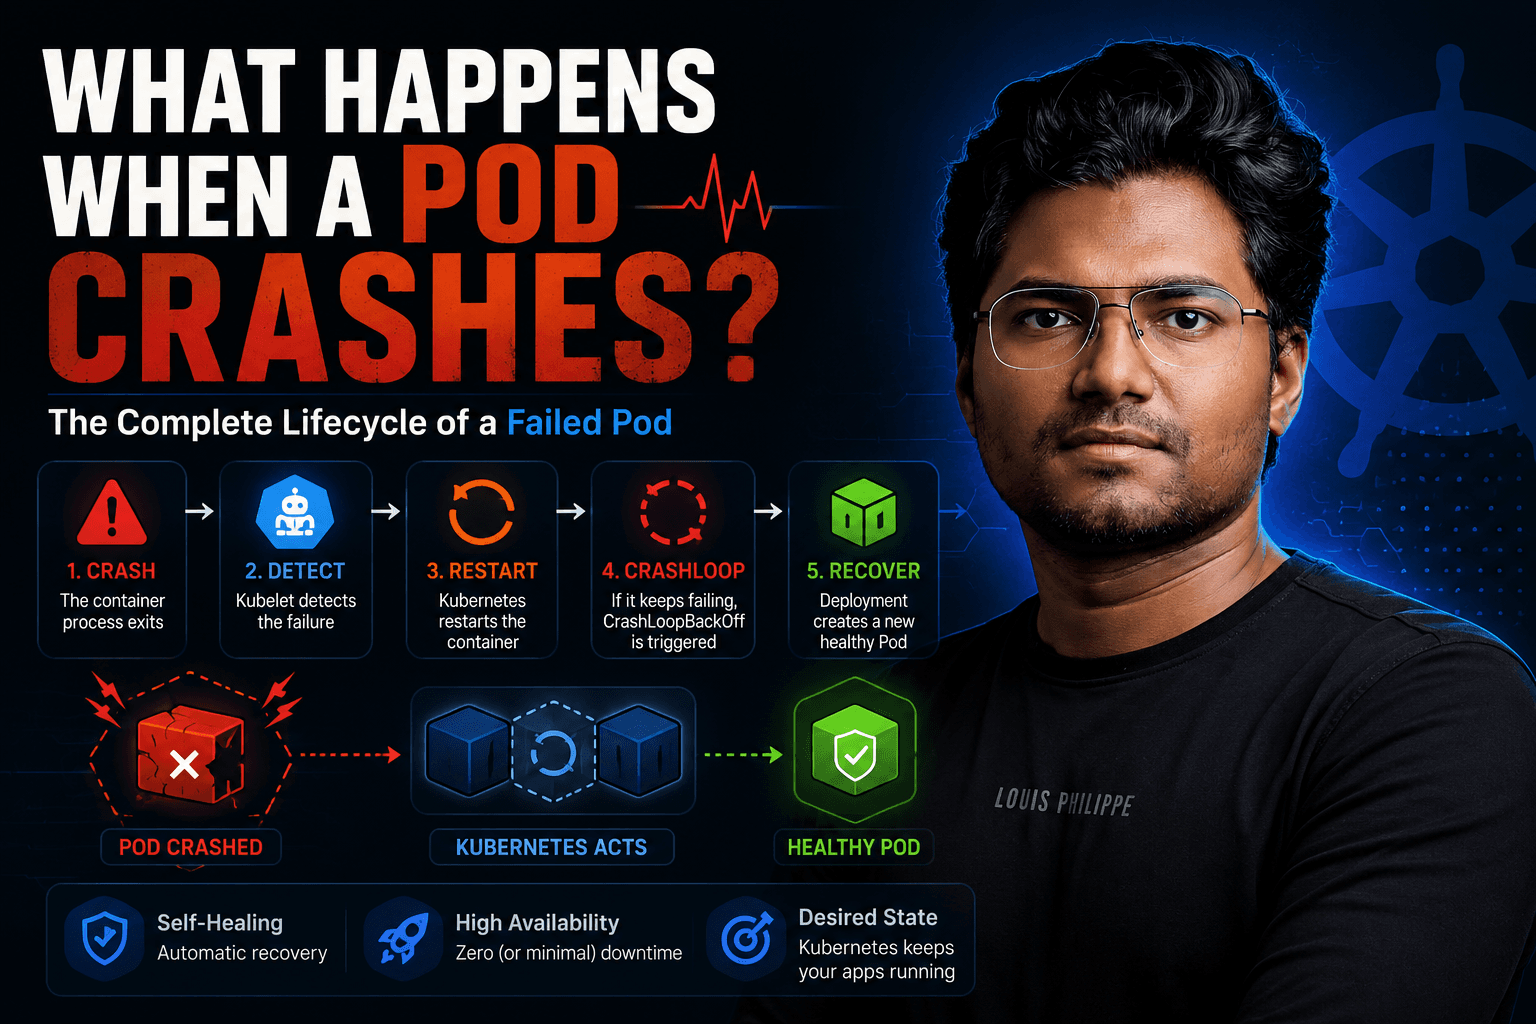
A Liveness Probe allows Kubernetes to detect this condition and restart the container automatically.
Example:
livenessProbe:
  httpGet:
    path: /health
    port: 8080
  initialDelaySeconds: 10
  periodSeconds: 5
In this example, Kubernetes checks the /health endpoint every five seconds.
If the endpoint repeatedly fails, Kubernetes assumes the application is unhealthy and restarts the container.
Why It Matters
Without a Liveness Probe:
Application freezes
↓
Container keeps running
↓
Users receive failures
↓
Nobody notices
With a Liveness Probe:
Application freezes
↓
Probe fails
↓
Container restarts
↓
Application recovers automatically
This can prevent many production incidents.
2. Readiness Probe
The Readiness Probe answers a different question:
Can this Pod receive traffic?
This is arguably the most important probe in production environments.
Consider a scenario where an application needs:
Database connectivity
Cache initialization
External API connections
The container may start immediately, but the application isn’t actually ready to serve users.
Example:
readinessProbe:
  httpGet:
    path: /ready
    port: 8080
  initialDelaySeconds: 5
  periodSeconds: 5
Until the probe succeeds, Kubernetes removes the Pod from Service endpoints.
This means traffic will not be sent to that Pod.
What Happens During Startup?
Pod Starts
↓
Application Initializing
↓
Readiness Probe Fails
↓
No Traffic Sent
↓
Application Ready
↓
Probe Succeeds
↓
Traffic Begins
Why It Matters
Without Readiness Probes:
Users may hit Pods that aren’t ready yet.
With Readiness Probes:
Only healthy and fully initialized Pods receive requests.
This significantly reduces deployment-related outages.
3. Startup Probe
The Startup Probe was introduced to solve a common problem.
Some applications take a long time to start.
Examples:
Java applications
Spring Boot services
Large enterprise applications
Without a Startup Probe, Kubernetes may interpret slow startup as a failure.
The result?
Application Starts Slowly
↓
Liveness Probe Fails
↓
Container Restarts
↓
Application Starts Again
↓
Infinite Crash Loop
A Startup Probe tells Kubernetes:
Give this application time to initialize before checking liveness.
Example:
startupProbe:
  httpGet:
    path: /startup
    port: 8080

  failureThreshold: 30
  periodSeconds: 10
This configuration allows up to five minutes for startup.
Once the Startup Probe succeeds, Kubernetes begins running the Liveness and Readiness Probes.
Why It Matters
Startup Probes are particularly useful for:
Java applications
Legacy enterprise systems
Applications with lengthy initialization processes
Visualizing All Three Probes
A simple way to remember them:
Startup Probe
↓
Has the application finished starting?
Readiness Probe
↓
Can the application receive traffic?
Liveness Probe
↓
Is the application still healthy?
Each probe focuses on a different stage of the application’s lifecycle.
Common Mistakes Developers Make
Mistake 1: Using the Same Endpoint Everywhere
Many teams configure:
/health
for all probes.
This often leads to unexpected behavior.
Each probe should ideally validate the condition it is responsible for.
Mistake 2: No Readiness Probe
This is one of the most common issues.
Without Readiness Probes:
New Pods receive traffic too early
Deployments become unstable
Users experience errors during releases
Mistake 3: Aggressive Timeouts
Some teams configure:
timeoutSeconds: 1
for everything.
Temporary network delays can cause false failures and unnecessary restarts.
Mistake 4: No Startup Probe For Slow Applications
Slow-starting applications often enter restart loops because Kubernetes assumes they have failed.
Startup Probes solve this problem elegantly.
Mistake 5: Checking External Dependencies Inside Liveness Probes
Imagine your liveness endpoint checks the database.
The database becomes unavailable.
The application is still healthy, but the liveness check fails.
Kubernetes starts restarting perfectly healthy Pods.
Now you’ve turned a database issue into an application outage.
Liveness checks should focus on application health, not dependency availability.
A Real Production Scenario
Imagine an e-commerce application.
Components:
Frontend
Backend API
Database
Redis Cache
When a new Backend Pod starts:
Container starts
Database connection initializes
Cache connection initializes
Readiness Probe remains failed
No traffic reaches the Pod
Initialization completes
Readiness Probe succeeds
Traffic begins
Users never notice the deployment.
This is exactly how modern cloud-native applications achieve reliability.
The Biggest Lesson I Learned
One of the biggest lessons I learned while preparing for CKAD and working with Kubernetes is that most outages aren’t caused by containers crashing.
They’re caused by applications appearing healthy when they actually aren’t.
A Pod can be running while serving errors.
A process can be alive while being completely unusable.
Health checks bridge that gap.
They allow Kubernetes to understand the true state of an application and respond accordingly.
Final Thoughts
Kubernetes Health Checks are one of those features that seem simple at first but become incredibly important in production environments.
Understanding the differences between:
✅ Liveness Probes
✅ Readiness Probes
✅ Startup Probes
can dramatically improve application reliability and reduce downtime.
If you’re learning Kubernetes, don’t just memorize the YAML syntax.
Understand the problem each probe is solving.
That’s the difference between deploying containers and operating production-ready applications.
Connect With Me
If you’re preparing for Kubernetes certifications, pursuing the Kubestronaut journey, or working in the cloud-native ecosystem, I’d love to connect.
Follow me for more articles on Kubernetes, CNCF certifications, DevOps, Platform Engineering, and Cloud-Native technologies.
LinkedIn: https://www.linkedin.com/in/shahzadaliahmad/
LFX Profile: https://openprofile.dev/profile/shahzadahmad91
Credly: https://www.credly.com/users/shahzadahmad
Website: https://shahzadahmad.dev/
If you found this article helpful, consider sharing it with others in the Kubernetes community.