Understanding Kubernetes Networking Without Getting Lost
Kubernetes networking is one of the most important — and often most confusing — topics for beginners. Pods have IP addresses, Services have virtual IPs, DNS magically resolves names, Ingress routes traffic, and Load Balancers expose applications to the outside world. At first, it can feel like a lot of moving pieces. But once you understand the purpose of each component and how they work together, Kubernetes networking becomes surprisingly logical.
When I first started learning Kubernetes, networking was the area that confused me the most.
Questions like:
How do Pods communicate with each other?
Why can’t applications just use Pod IP addresses?
What exactly is a Service?
How does Kubernetes DNS work?
What is the difference between Ingress and a Load Balancer?
How does traffic travel from a user’s browser all the way to a Pod?
kept appearing throughout my learning journey.
In this article, we’ll break Kubernetes networking down into simple concepts and build a mental model that helps you understand how everything fits together.
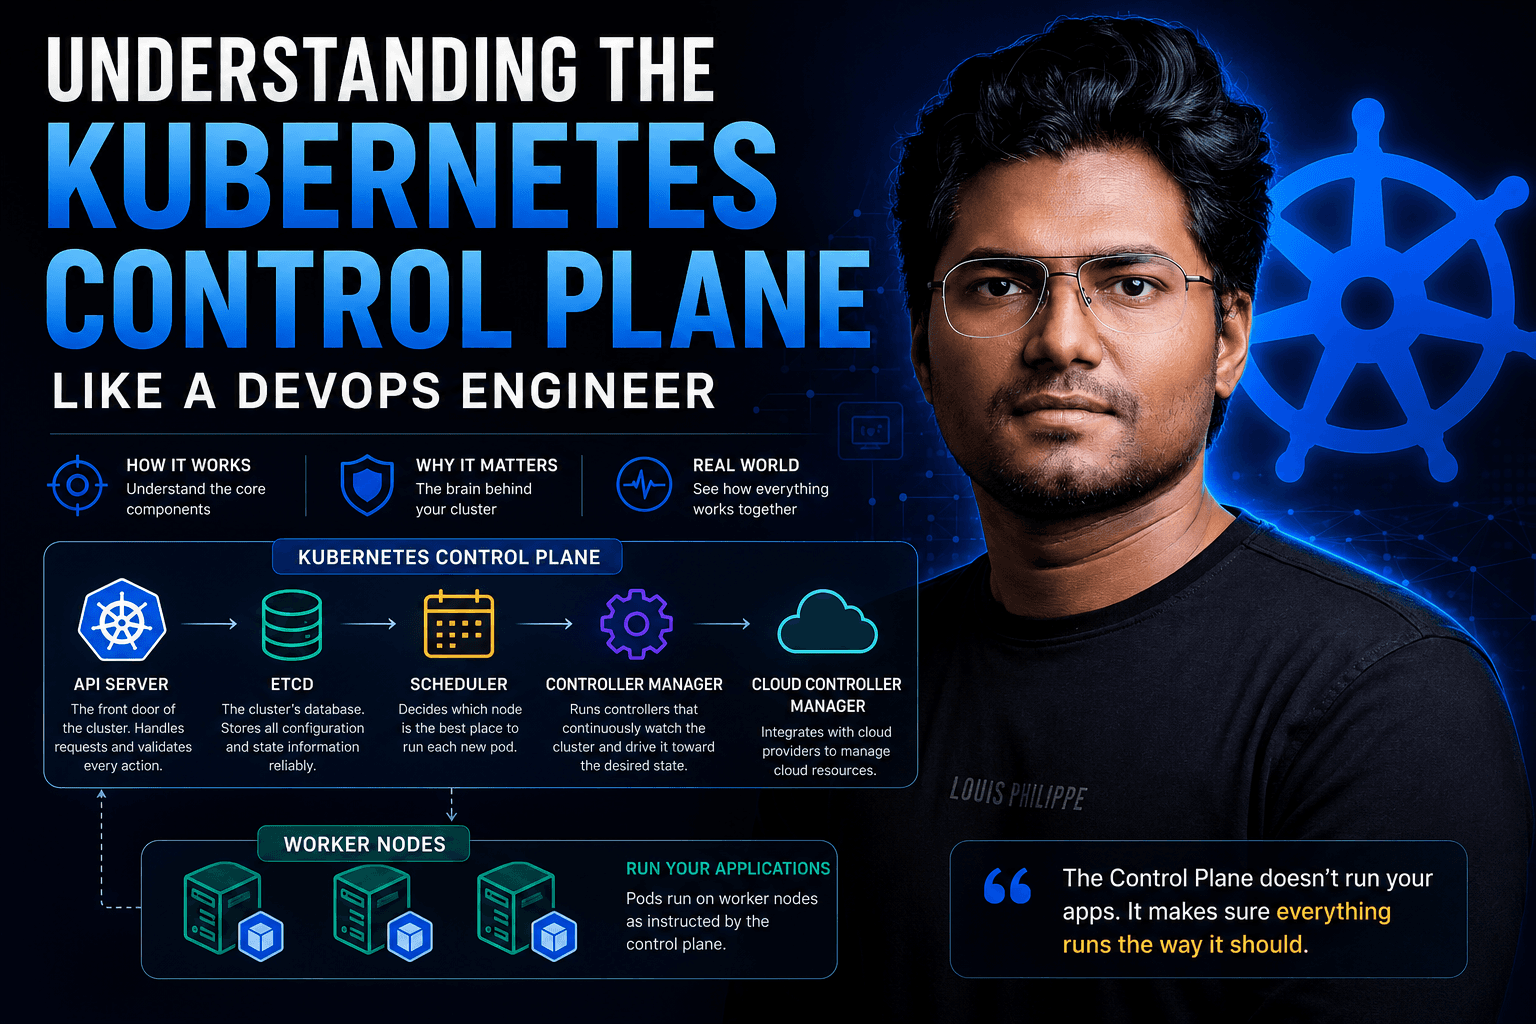
Understanding the Kubernetes Networking Model
Before diving into Services and Ingress, it’s important to understand one of Kubernetes’ core networking principles:
Every Pod gets its own IP address, and every Pod can communicate directly with every other Pod in the cluster.
Unlike traditional container environments where containers often share a host network or require Network Address Translation (NAT), Kubernetes treats Pods as first-class network citizens.
This means:
Pods can communicate across nodes.
Pods don’t need port mapping to talk to each other.
Applications can assume network connectivity exists between Pods.
To make this possible, Kubernetes relies on a Container Network Interface (CNI) plugin such as:
Calico
Cilium
Flannel
Weave Net
The CNI plugin is responsible for assigning Pod IP addresses and ensuring traffic can flow between Pods across different nodes.
Without a CNI plugin, Kubernetes networking simply wouldn’t work.
Start With a Simple Application
Imagine you deploy a web application.
apiVersion: apps/v1
kind: Deployment
metadata:
  name: web-app
spec:
  replicas: 3
Kubernetes creates three Pods:
web-app-pod-1
web-app-pod-2
web-app-pod-3
Each Pod receives its own IP address.
10.244.1.10
10.244.1.11
10.244.1.12
These IP addresses are assigned by the cluster’s networking layer.
Now imagine another Pod wants to communicate with one of these Pods.
It can directly send traffic to:
10.244.1.10
or
10.244.1.11
without any special configuration.
This direct Pod-to-Pod communication is one of Kubernetes’ most powerful networking features.
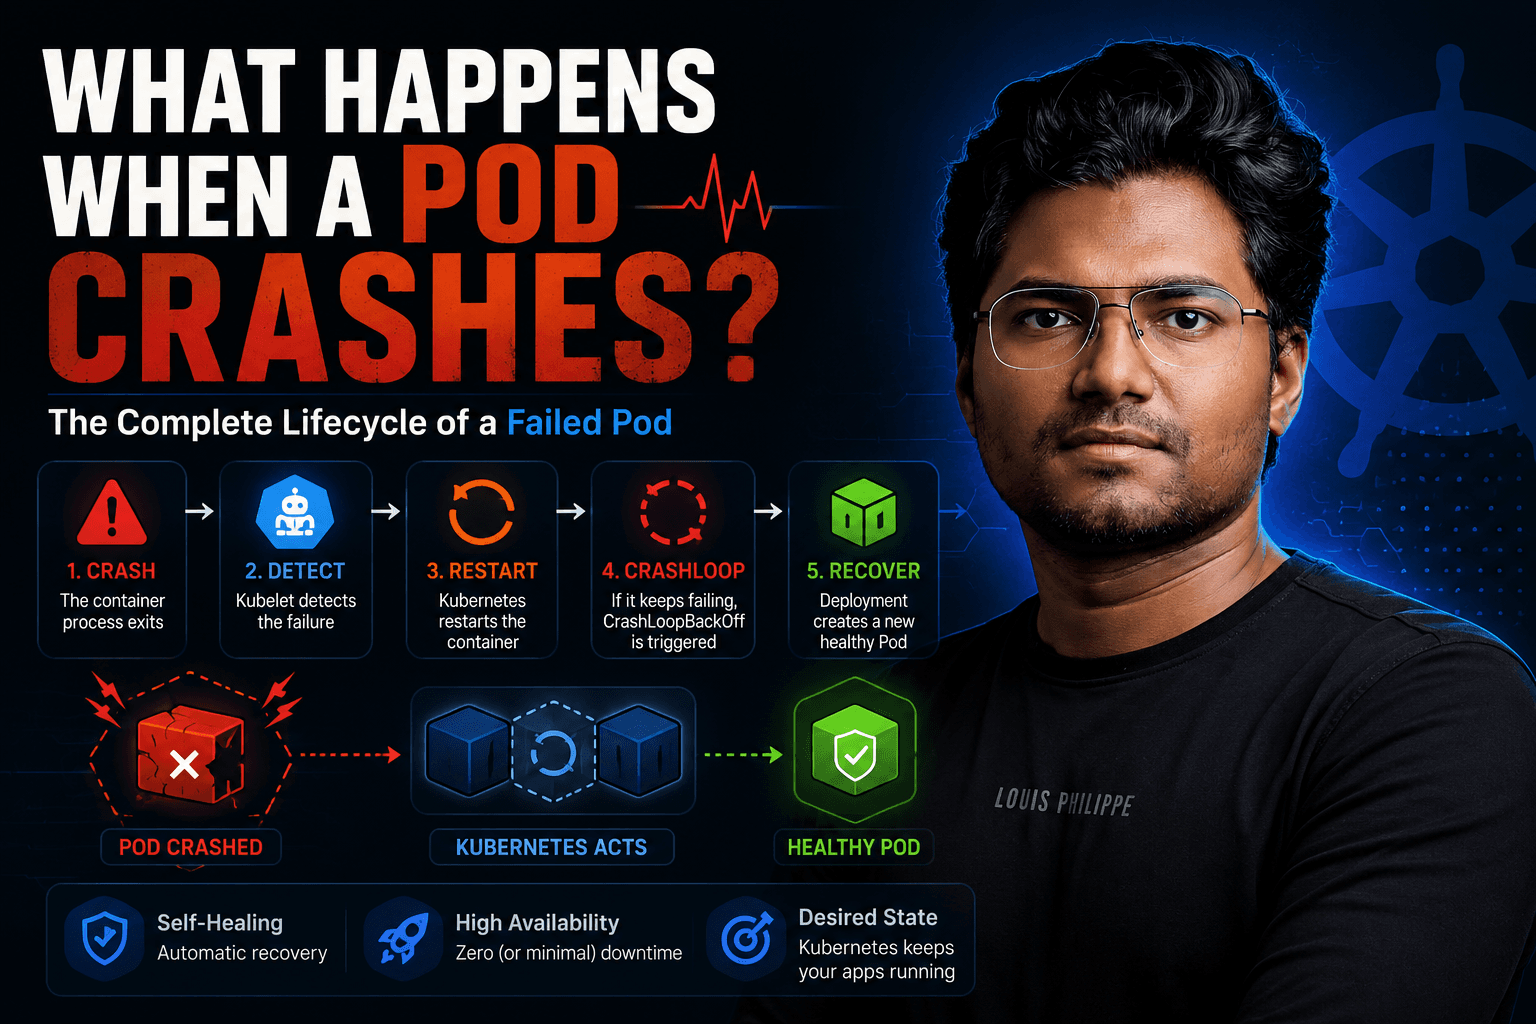
The First Problem: Pod IPs Are Not Permanent
While Pod IPs are useful, they introduce a major challenge.
Pods are ephemeral.
If a Pod crashes, gets rescheduled, or is replaced during a deployment, Kubernetes creates a new Pod.
For example:
Old Pod IP:
10.244.1.10
After recreation:
New Pod IP:
10.244.1.25
The application is still running, but its IP address has changed.
Imagine hundreds of applications depending on that IP.
Everything would break.
This is why applications should never depend directly on Pod IP addresses.
We need a stable endpoint that remains consistent even when Pods come and go.
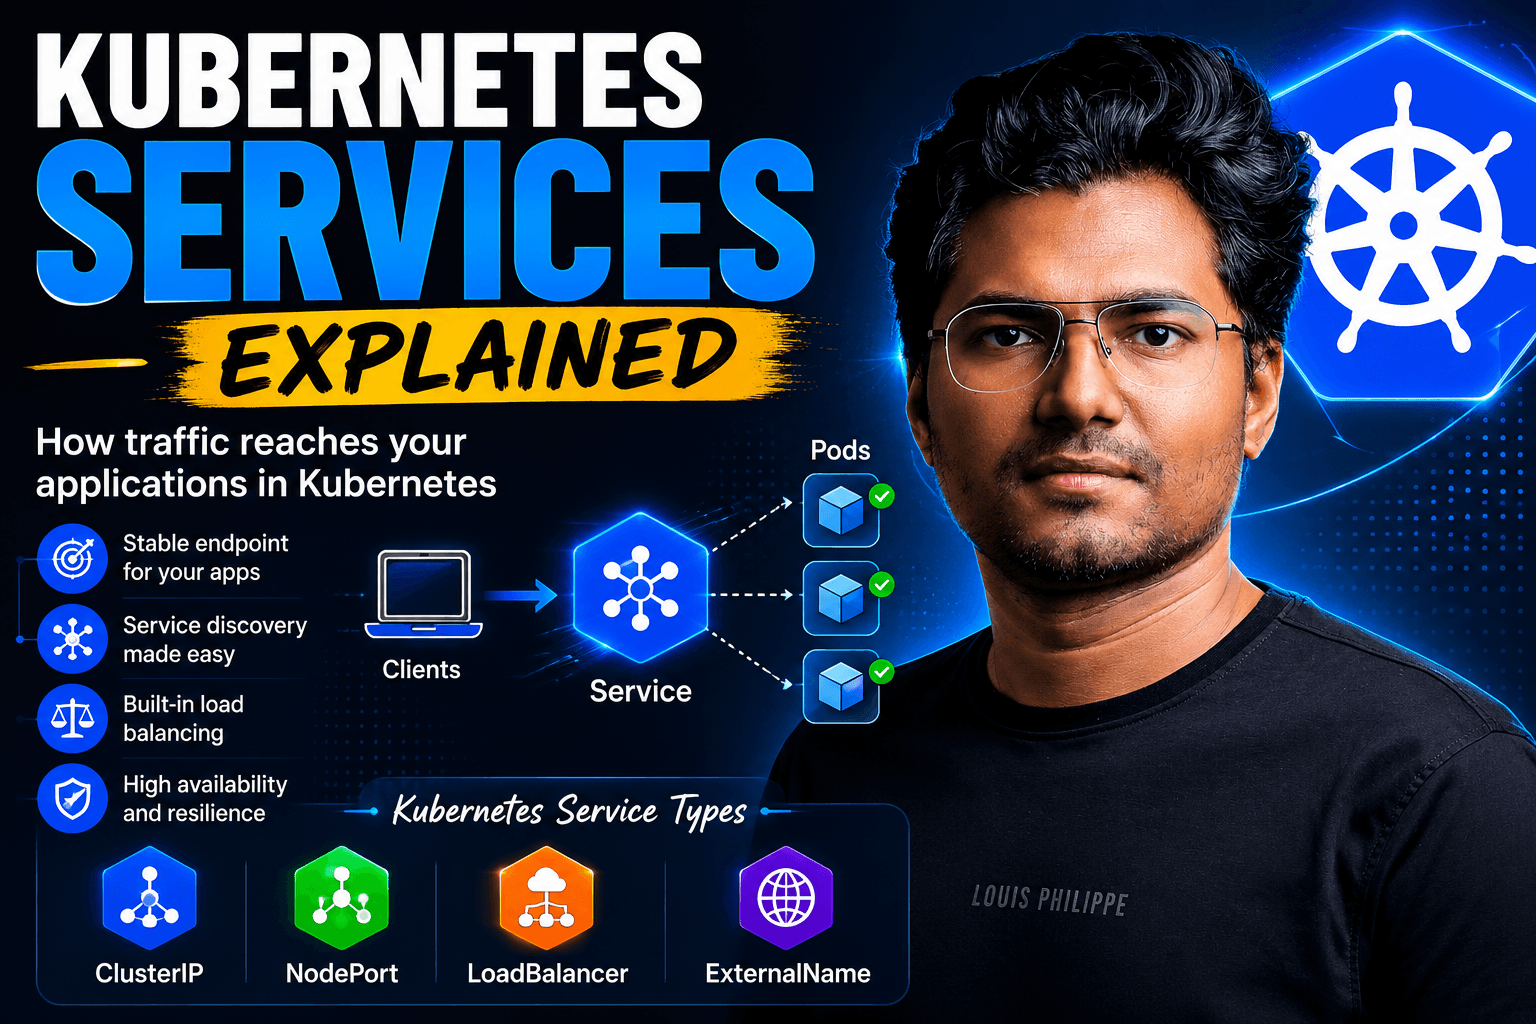
Enter Kubernetes Services
A Kubernetes Service solves this problem.
A Service provides:
A stable virtual IP address
A stable DNS name
Load balancing across Pods
Let’s create a Service.
kind: Service
metadata:
  name: web-service
Kubernetes assigns a virtual IP:
10.96.15.20
Unlike Pod IPs, this IP remains stable.
Applications now communicate with:
web-service
instead of individual Pods.
Think of a Service as a permanent front door that always knows which Pods are currently available.
Even if Pods are recreated, the Service remains unchanged.
How Services Find Pods
Services don’t magically know where Pods are.
They use labels and selectors.
Suppose your Pods have the label:
labels:
  app: web-app
The Service might use:
selector:
  app: web-app
Kubernetes continuously watches for Pods matching this selector.
Whenever Pods are added or removed, Kubernetes updates the Service endpoints automatically.
For example:
web-service
    ↓
+----------------+
| Pod 1          |
| Pod 2          |
| Pod 3          |
+----------------+
If Pod 2 crashes:
web-service
    ↓
+----------------+
| Pod 1          |
| Pod 3          |
+----------------+
Traffic continues flowing without interruption.
How Traffic Reaches a Pod
Let’s say a frontend application sends a request.
Frontend → web-service
The request doesn’t go directly to a Pod.
Instead, Kubernetes performs several steps:
Frontend
    ↓
Service
    ↓
Endpoints
    ↓
Selected Pod
Example:
Frontend
    ↓
web-service
    ↓
web-app-pod-2
The frontend doesn’t care which Pod receives the request.
The Service handles load balancing automatically.
This abstraction is what allows Kubernetes applications to scale seamlessly.
Understanding Endpoints
Behind every Service is an Endpoint object.
Endpoints contain the actual Pod IP addresses associated with the Service.
Example:
web-service
might map to:
10.244.1.10
10.244.1.11
10.244.1.12
You can view them using:
kubectl get endpoints
When troubleshooting networking issues, checking endpoints is often one of the first things you should do.
If a Service has no endpoints, traffic has nowhere to go.
Kubernetes DNS Makes Service Discovery Easy
Imagine managing hundreds of Services.
Remembering IP addresses would be impossible.
This is where CoreDNS comes in.
CoreDNS runs inside the cluster and provides service discovery.
When a Service is created:
web-service
Kubernetes automatically creates a DNS record:
web-service.default.svc.cluster.local
Applications can simply use:
http://web-service
instead of IP addresses.
DNS resolves the name to the Service IP automatically.
This allows microservices to communicate using meaningful names rather than constantly changing addresses.
Understanding DNS Resolution
Suppose a Pod sends:
http://web-service
The process looks like this:
Application
      ↓
CoreDNS
      ↓
Service IP
      ↓
Service
      ↓
Pod
Everything happens automatically.
Most developers never need to think about the underlying DNS mechanics because Kubernetes handles it for them.
Types of Kubernetes Services
Not all Services are designed for the same purpose.
Kubernetes provides several Service types.
ClusterIP
This is the default Service type.
type: ClusterIP
Traffic flow:
Pod
 ↓
ClusterIP Service
 ↓
Pod
Characteristics:
Internal only
Not accessible from outside the cluster
Most commonly used Service type
Ideal for:
Databases
Internal APIs
Backend services
NodePort
NodePort exposes an application on every Kubernetes node.
type: NodePort
Example:
192.168.1.10:30080
Traffic flow:
User
 ↓
Node IP:30080
 ↓
Service
 ↓
Pod
Advantages:
Simple
Useful for testing
Disadvantages:
Limited port range
Not ideal for production
Difficult to manage at scale
LoadBalancer
LoadBalancer is commonly used in cloud environments.
type: LoadBalancer
When created, Kubernetes asks the cloud provider to provision an external load balancer.
Example:
Internet
    ↓
AWS ELB
    ↓
Service
    ↓
Pods
Supported by:
Amazon EKS
Azure AKS
Google GKE
Advantages:
Production-ready
Automatically managed
Provides external access
Disadvantages:
Additional cloud costs
One load balancer per Service
Why We Need Ingress
Imagine deploying multiple applications.
shop.example.com
api.example.com
admin.example.com
Without Ingress, you might create three separate LoadBalancers.
LoadBalancer #1 → Shop
LoadBalancer #2 → API
LoadBalancer #3 → Admin
This quickly becomes expensive and difficult to manage.
Ingress solves this problem.
What Is Ingress?
Ingress is an API object that defines routing rules for HTTP and HTTPS traffic.
Example:
shop.example.com → Shop Service
api.example.com → API Service
admin.example.com → Admin Service
Traffic flow:
Internet
      ↓
Ingress Controller
      ↓
+-------------------+
| shop.example.com  |
| api.example.com   |
| admin.example.com |
+-------------------+
One external endpoint can serve multiple applications.
Ingress Controllers
An Ingress resource by itself does nothing.
You need an Ingress Controller to implement the routing rules.
Popular options include:
NGINX Ingress Controller
Traefik
HAProxy
Kong
AWS Load Balancer Controller
Think of the Ingress resource as configuration and the Ingress Controller as the actual software performing the routing.
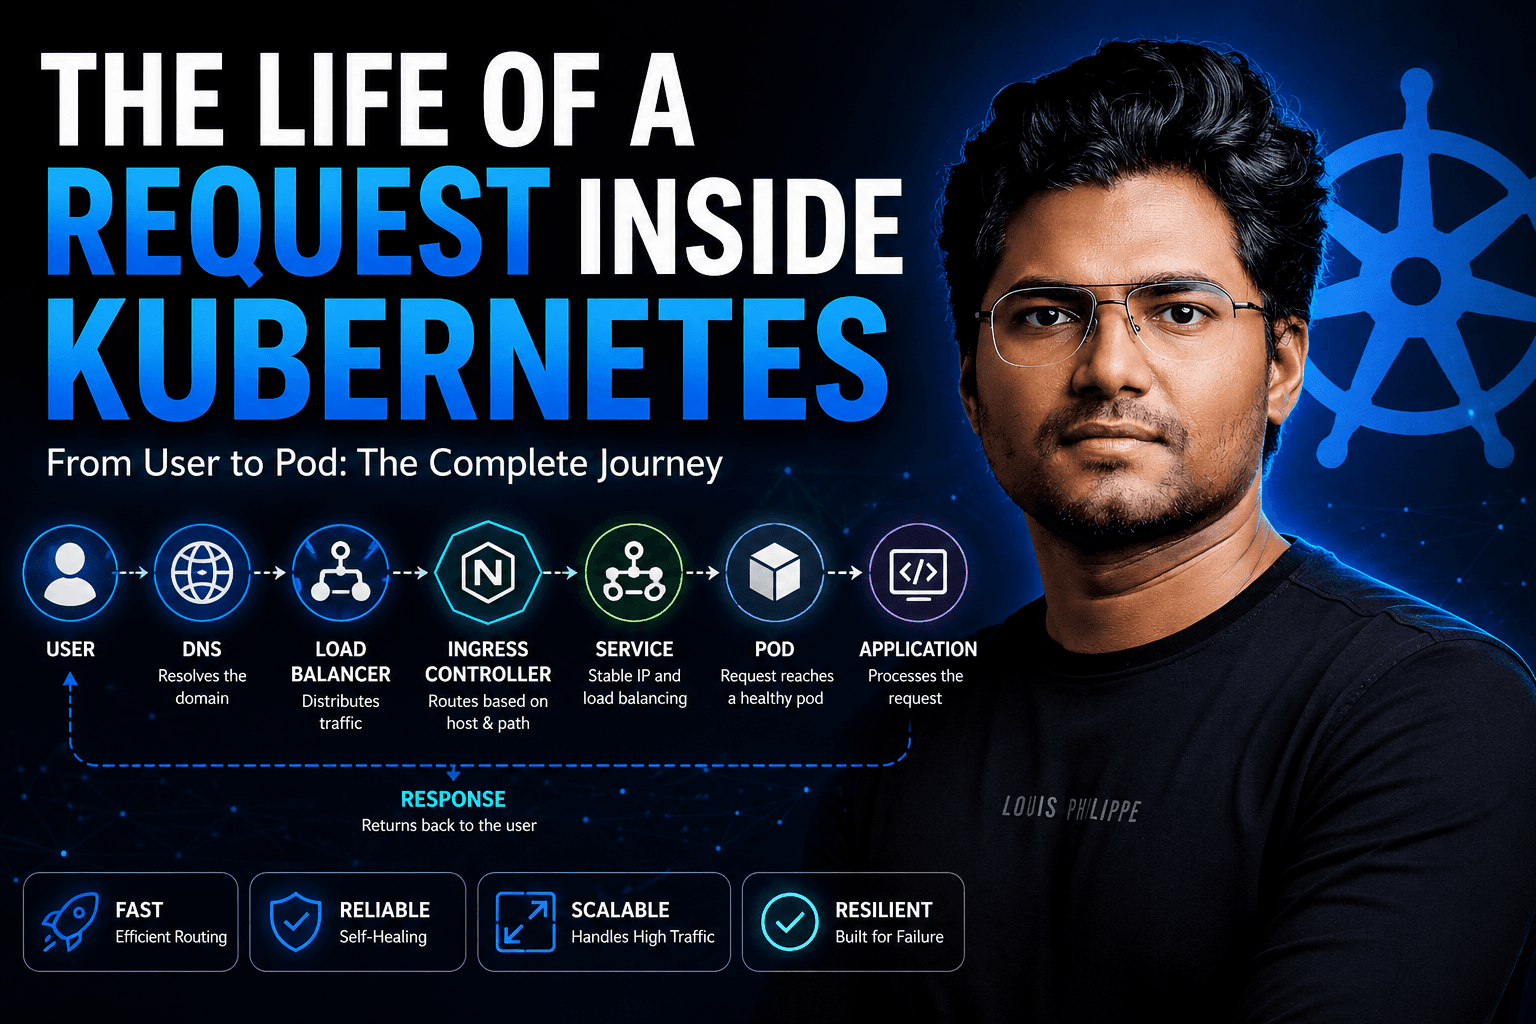
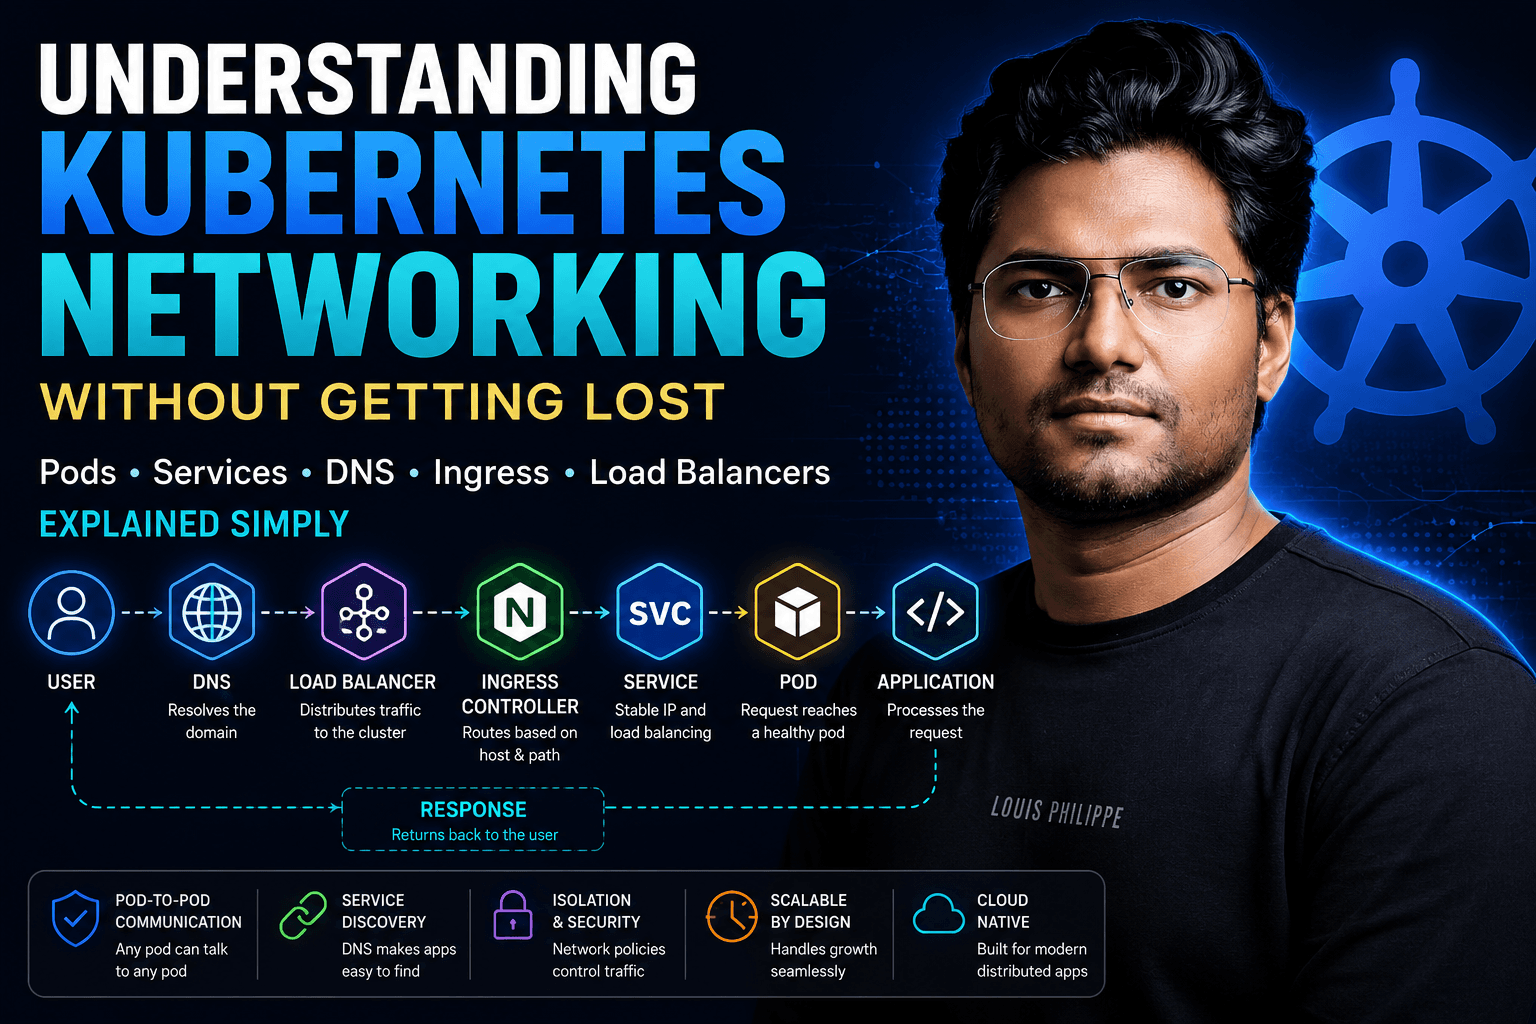
The Complete Journey of a Request
Let’s follow a request from a user’s browser.
Suppose a user visits:
https://shop.example.com
The request travels through multiple layers.
User
 ↓
DNS
 ↓
Load Balancer
 ↓
Ingress Controller
 ↓
Service
 ↓
Pod
 ↓
Application
Let’s break this down.
Step 1: DNS Resolution
DNS resolves:
shop.example.com
to the external IP address of the load balancer.
Step 2: Load Balancer
The cloud load balancer receives the request and forwards it to the Ingress Controller.
Step 3: Ingress Controller
The Ingress Controller examines:
Host: shop.example.com
and determines which Service should receive the request.
Step 4: Service
The Service selects a healthy Pod.
Step 5: Pod
The Pod processes the request and generates a response.
Step 6: Response
The response travels back through the same path.
Application
 ↓
Pod
 ↓
Service
 ↓
Ingress
 ↓
Load Balancer
 ↓
User
Understanding this flow is the key to understanding Kubernetes networking.
Network Policies: Controlling Traffic
By default, Kubernetes networking is very open.
Pods can generally communicate with each other.
Sometimes that’s not desirable.
For example:
Frontend → Backend ✅
Frontend → Database ✅
Random Pod → Database ❌
Network Policies allow you to restrict traffic.
Example use cases:
Allow only frontend Pods to access backend Pods
Restrict database access
Enforce zero-trust networking
Network Policies act like Kubernetes firewalls for Pods.
Common Kubernetes Networking Issues
When troubleshooting networking problems, I usually investigate these areas first.
Pod Not Running
kubectl get pods
If the Pod isn’t healthy, networking won’t matter.
Service Not Matching Labels
kubectl get endpoints
No endpoints usually means the Service selector doesn’t match any Pods.
DNS Problems
kubectl exec -it pod -- nslookup web-service
Verify DNS resolution inside the cluster.
Ingress Misconfiguration
kubectl describe ingress
Check routing rules and events.
Network Policies Blocking Traffic
kubectl get networkpolicy
A restrictive policy may be preventing communication.
Connectivity Testing
Use tools like:
curl
wget
ping
from inside Pods to verify connectivity.
The Mental Model That Changed Everything
Instead of memorizing Kubernetes networking components individually, think of them as layers that solve specific problems.
User
 ↓
Load Balancer
 ↓
Ingress
 ↓
Service
 ↓
Pod
Each layer adds a capability.

Once this model clicks, Kubernetes networking becomes much easier to reason about.
Final Thoughts
Networking is often the topic that intimidates Kubernetes beginners the most, but the underlying concepts are actually straightforward.
Pods provide compute.
Services provide stable connectivity.
DNS provides service discovery.
Ingress provides intelligent routing.
Load Balancers provide external access.
Network Policies provide security.
Together, these components create a powerful networking model that allows applications to communicate reliably, scale dynamically, and remain resilient even as Pods are constantly created and destroyed.
The next time someone says Kubernetes networking is complicated, remember:
Kubernetes networking is simply a collection of layers working together to move traffic from a user to a Pod — and back again.
Once you understand the role of each layer, everything starts to make sense.
Connect With Me
If you’re preparing for Kubernetes certifications, pursuing the Kubestronaut journey, or working in the cloud-native ecosystem, I’d love to connect.
Follow me for more articles on Kubernetes, CNCF certifications, DevOps, Platform Engineering, and Cloud-Native technologies.
LinkedIn: https://www.linkedin.com/in/shahzadaliahmad/
LFX Profile: https://openprofile.dev/profile/shahzadahmad91
Credly: https://www.credly.com/users/shahzadahmad
Website: https://shahzadahmad.dev/
If you found this article helpful, consider sharing it with others in the Kubernetes community.