Understanding the Kubernetes Control Plane Like a DevOps Engineer
Kubernetes Control Plane explained in a practical way for engineers who manage real-world clusters.
Introduction
When I first started learning Kubernetes, I could create Pods, Deployments, and Services without much trouble.
I learned the commands, deployed applications, exposed services, and even scaled workloads.
But there was one thing that always felt like a black box:
The Kubernetes Control Plane.
Everyone says:
“The Control Plane manages the cluster.”
But what does that actually mean?
What happens behind the scenes when you run a simple command like:
kubectl apply -f deployment.yaml
How does Kubernetes know where to place Pods?
Who decides which node should run them?
Who notices when a Pod crashes?
Who creates a replacement Pod?
Who ensures that the cluster always matches what you defined in your YAML files?
The answer to all these questions lies inside the Kubernetes Control Plane.
Understanding the Control Plane is one of the biggest steps toward becoming a confident Kubernetes engineer. Once you understand how these components work together, troubleshooting becomes easier, cluster behavior becomes more predictable, and many Kubernetes concepts suddenly make sense.
In this article, I’ll explain the Kubernetes Control Plane in a practical and beginner-friendly way, focusing on what each component does and how they work together to keep your applications running.
What Is the Kubernetes Control Plane?
Think of Kubernetes as a city.
The worker nodes are the buildings where people live and work.
The applications running inside Pods are the citizens.
The Control Plane is the city administration.
The administration doesn’t do the actual work happening inside the buildings. Instead, it manages the city, enforces rules, allocates resources, and ensures everything operates smoothly.
Similarly, the Kubernetes Control Plane does not run your application containers directly.
Instead, it:
Receives instructions from users
Stores cluster information
Decides where workloads should run
Monitors cluster health
Replaces failed workloads
Maintains the desired state of the cluster
Without the Control Plane:
No Pods would be scheduled
No Deployments would be created
No scaling would occur
No self-healing would exist
No cluster management would be possible
The Control Plane is essentially the brain of Kubernetes.
Its primary responsibility is to continuously compare what the cluster should look like with what it currently looks like, and then take actions to eliminate any differences.
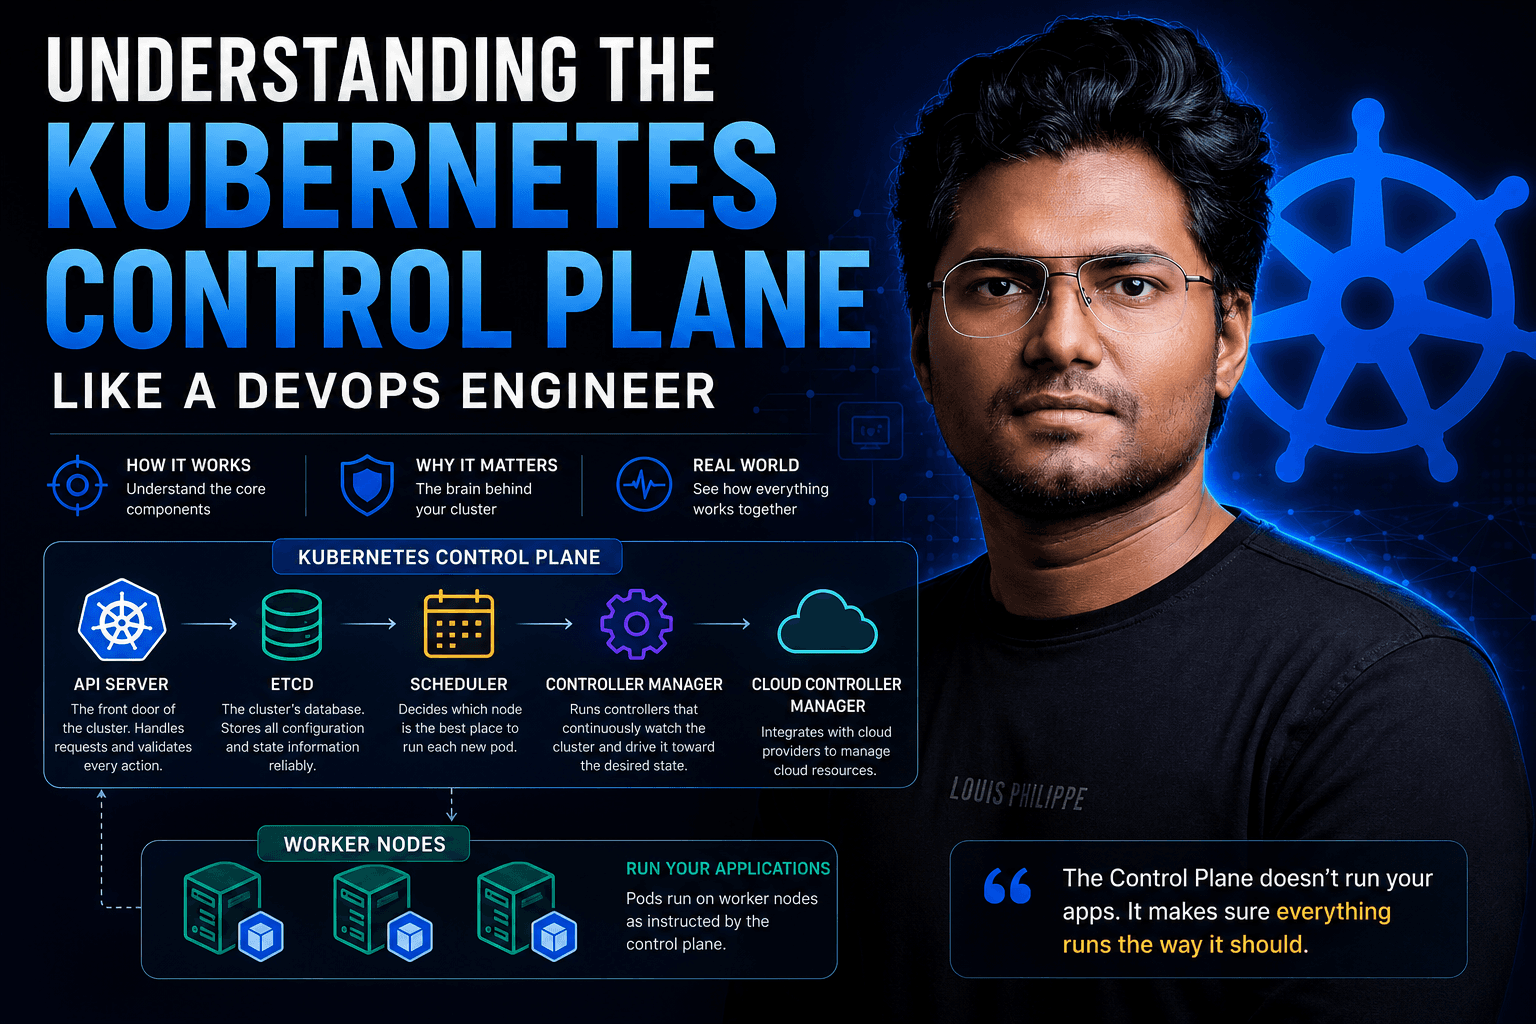
The Main Components of the Control Plane
The Kubernetes Control Plane is made up of several components that work together.
Each component has a specific responsibility, and together they create the automation that Kubernetes is famous for.
1. API Server
The API Server is the most important component of the Control Plane.
It acts as the central communication hub for the entire cluster.
Every interaction with Kubernetes goes through the API Server.
Examples:
kubectl get pods
kubectl apply -f deployment.yamlkubectl delete pod nginx
Even when internal Kubernetes components communicate with each other, they usually do so through the API Server.
What Does the API Server Do?
The API Server performs several critical tasks:
Receives requests from users and components
Authenticates users
Authorizes actions
Validates resource definitions
Processes API requests
Stores and retrieves data from etcd
For example, when you create a Deployment, the API Server checks whether the YAML file is valid and whether you have permission to create that resource.
Only after validation does it save the information into Kubernetes.
Think of the API Server as the receptionist and gatekeeper of the cluster.
Nothing enters or leaves Kubernetes without passing through it.
2. etcd
If the API Server is the front door, then etcd is the storage room where all cluster information is kept.
etcd is a distributed key-value database used by Kubernetes.
It stores the entire state of the cluster.
This includes:
Pods
Deployments
Services
Secrets
ConfigMaps
Nodes
Namespaces
Persistent Volumes
Cluster configuration
Every important piece of information about your cluster lives inside etcd.
Why Is etcd So Important?
Imagine your cluster suddenly loses its etcd database.
Even if your worker nodes are still running, Kubernetes would lose knowledge about:
Which Deployments exist
Which Services exist
Desired replica counts
Cluster configuration
This is why etcd backups are considered one of the most important parts of Kubernetes disaster recovery.
Example
When you run:
kubectl apply -f deployment.yaml
the Deployment definition is ultimately stored inside etcd.
From that point onward, Kubernetes treats that stored definition as the desired state of the cluster.
You can think of etcd as Kubernetes’ memory.
Without memory, the brain cannot function.
3. Scheduler
Once Kubernetes knows that a Pod needs to be created, another question arises:
Where should this Pod run?
This decision is made by the Kubernetes Scheduler.
The Scheduler’s job is to find the most suitable worker node for every unscheduled Pod.
Suppose you create a Deployment with:
replicas: 3
Kubernetes now needs three Pods.
The Scheduler evaluates all available nodes and determines the best placement.
What Does the Scheduler Consider?
The Scheduler looks at many factors, including:
Available CPU resources
Available memory resources
Resource requests and limits
Node selectors
Affinity and anti-affinity rules
Taints and tolerations
Node health
Existing workloads
For example, if a node does not have enough memory available, the Scheduler may choose another node.
If a Pod requires a specific label such as:
nodeSelector:
  environment: production
the Scheduler will only consider nodes matching that label.
What Happens Without the Scheduler?
Without the Scheduler, Pods would remain stuck in:
Pending
because Kubernetes would know that Pods need to exist but would have no idea where to place them.
The Scheduler is essentially the decision-maker responsible for workload placement.
4. Controller Manager
Controllers are arguably the most powerful part of Kubernetes.
They are responsible for maintaining the desired state of the cluster.
Their logic is simple:
Observe the current state, compare it with the desired state, and take corrective action if they differ.
This process runs continuously.
Desired State vs Actual State
Suppose your Deployment specifies:
replicas: 3
This means your desired state is:
running pods: 3
Now imagine one Pod crashes.
The actual state becomes:
running pods: 2
The Controller notices the mismatch.
It immediately creates another Pod to restore the desired state.
This automatic correction is what we call self-healing.
Why Controllers Matter
Without Controllers:
Failed Pods would never be replaced
Scaling would not work
Deployments would not progress
Cluster state would drift over time
Controllers are constantly watching the cluster and making adjustments whenever necessary.
They are the reason Kubernetes can operate with minimal human intervention.
Common Controllers
The Controller Manager runs multiple controllers, each responsible for a specific resource type.
Deployment Controller
The Deployment Controller manages Deployments.
It ensures that the correct ReplicaSets exist and that rolling updates happen correctly.
ReplicaSet Controller
The ReplicaSet Controller ensures that the required number of Pod replicas are running.
If a Pod disappears, it creates a replacement.
Node Controller
The Node Controller monitors worker nodes.
If a node becomes unreachable, Kubernetes can take corrective actions and reschedule workloads elsewhere.
Job Controller
The Job Controller manages batch workloads and ensures that Jobs complete successfully.
Endpoint Controller
The Endpoint Controller updates Service endpoints whenever Pods are added or removed.
Together, these controllers continuously monitor cluster resources and keep everything aligned with the desired state.
5. Cloud Controller Manager
When Kubernetes runs in cloud environments such as AWS, Azure, or Google Cloud, it needs a way to interact with cloud-specific services.
This responsibility belongs to the Cloud Controller Manager.
It acts as a bridge between Kubernetes and the cloud provider.
Common Tasks
The Cloud Controller Manager can:
Create cloud load balancers
Manage cloud networking routes
Attach and detach storage volumes
Manage cloud-based node information
For example, when you create a Service of type LoadBalancer:
type: LoadBalancer
Kubernetes communicates with the cloud provider through the Cloud Controller Manager.
The cloud provider then creates an actual load balancer and assigns a public IP address.
Without this component, Kubernetes would not know how to interact with cloud infrastructure.
What Happens When You Create a Deployment?
Let’s walk through the complete lifecycle of a Deployment request.
You execute:
kubectl apply -f deployment.yaml
Step 1
kubectl sends the Deployment definition to the API Server.
Step 2
The API Server authenticates the request, validates the YAML, and checks permissions.
Step 3
The Deployment definition is stored inside etcd.
At this point, Kubernetes knows what the desired state should be.
Step 4
The Deployment Controller notices that a new Deployment has been created.
Step 5
The Deployment Controller creates a ReplicaSet.
Step 6
The ReplicaSet Controller creates the required Pods.
Step 7
The Scheduler detects Pods that have not yet been assigned to any node.
Step 8
The Scheduler evaluates available nodes and selects the most suitable ones.
Step 9
The selected nodes receive instructions through their Kubelets.
Step 10
Kubelet pulls the container image and starts the containers.
Step 11
The Pods become healthy and transition to the Running state.
Your application is now live.
Although this process involves multiple components, it usually completes within seconds.
How Self-Healing Actually Works
Self-healing is one of Kubernetes’ most valuable features.
Let’s see how it works in practice.
Imagine you have a Deployment configured with:
replicas: 3
The cluster currently has:
Desired Pods = 3
Actual Pods = 3
Everything is healthy.
Now suppose one Pod crashes unexpectedly.
The cluster state becomes:
Desired Pods = 3
Actual Pods = 2
The Controller immediately notices the difference.
It creates a replacement Pod.
The Scheduler assigns the new Pod to a suitable node.
The Kubelet starts the container.
After a short period, the cluster returns to:
Desired Pods = 3
Actual Pods = 3
No administrator needs to log in.
No manual restart is required.
Kubernetes automatically restores the desired state.
This continuous reconciliation process is the foundation of Kubernetes automation.
Why DevOps Engineers Must Understand the Control Plane
Many engineers know how to use Kubernetes commands.
Far fewer understand what happens behind those commands.
Understanding the Control Plane provides significant advantages.
Faster Troubleshooting
When Pods remain stuck in:
Pending
you immediately know to investigate the Scheduler.
When Deployments fail to maintain replicas:
Think Controllers.
When cluster data disappears:
Think etcd.
When API requests fail:
Think API Server.
Understanding component responsibilities dramatically reduces troubleshooting time.
Better Cluster Design
Knowledge of the Control Plane helps you design more reliable clusters.
You’ll make better decisions regarding:
High availability
Multi-control-plane architectures
Backup strategies
Disaster recovery planning
Cluster scaling
Better Interviews
Many Kubernetes interviews focus heavily on Control Plane concepts.
Questions such as:
What is etcd?
What does the Scheduler do?
How does the API Server work?
What are Controllers?
How does Kubernetes self-heal workloads?
become much easier to answer when you understand the architecture behind the platform.
The Mental Model I Use
Whenever I work with Kubernetes, I remember this simple flow:
User
 ↓
API Server
 ↓
etcd
 ↓
Controllers
 ↓
Scheduler
 ↓
Worker Nodes
 ↓
Pods
Here’s how I interpret it:
Users submit requests.
The API Server receives them.
etcd stores the desired state.
Controllers monitor and enforce that state.
The Scheduler decides placement.
Worker nodes run the workloads.
Pods deliver the application.
The Control Plane continuously watches every step of this process and ensures reality matches the desired state.
That single idea explains most of Kubernetes.
Final Thoughts
The Kubernetes Control Plane is what transforms Kubernetes from a simple container platform into a powerful orchestration system.
The API Server acts as the communication hub.
etcd stores the cluster’s source of truth.
Controllers continuously reconcile desired and actual states.
The Scheduler determines where workloads should run.
The Cloud Controller Manager integrates Kubernetes with cloud infrastructure.
Together, these components create the automation, scalability, resilience, and self-healing capabilities that make Kubernetes so powerful.
Once you truly understand the Control Plane, Kubernetes stops feeling like magic.
Instead, it becomes a system whose behavior you can predict, troubleshoot, and confidently operate in production.
And that’s the point where you stop being just a Kubernetes user and start thinking like a Kubernetes engineer.
Connect With Me
If you’re preparing for Kubernetes certifications, pursuing the Kubestronaut journey, or working in the cloud-native ecosystem, I’d love to connect.
Follow me for more articles on Kubernetes, CNCF certifications, DevOps, Platform Engineering, and Cloud-Native technologies.
LinkedIn: https://www.linkedin.com/in/shahzadaliahmad/
LFX Profile: https://openprofile.dev/profile/shahzadahmad91
Credly: https://www.credly.com/users/shahzadahmad
Website: https://shahzadahmad.dev/
If you found this article helpful, consider sharing it with others in the Kubernetes community.